Actually adding custom domain is very important in a site/blog hosted on free platform like Blogger and WordPress. Today's post is something special, because in this post I am gonna show how you can add a Free domain to your Blogger blog.
The domain that I'm talking about is Dot TK domain. This domain is powered by FreeNom and it is completely free of cost for 1 to 12 months. Beside Dot TK domain FreeNom provide a few more free domain name. But Dot TK is most popular one. Below I'm presenting the list of free domain provided by FreeNom...
- .TK
- .ML
- .GA
- .CF
- .GQ
It is always better to use a top level domain for a site. But as you all know to have a domain like .COM , .NET or .ORG you will have to pay yearly charge. So, if you want to add custom domain without spending money then why don't you try Free Domain. As using custom domain is very important - So, this Free Domain is like Something is Better then Nothing.
By the way don't worry about the domain quality. The domain provided by FreeNom is very good in quality like any other top level domain. Even these blog is making use of .GA domain name presently though am planning in changing it to a paid domain name, but pending the time of changing freenom is still good to use as a custom domain name. And I have found this domain very convincing.
Now Let's see how to Register a Free domain on FreeNom and Add it to Blogger Blog.
Note: The Registration and Setup procedure might be changed time to time. If you face any problem then don't hesitate to let me know by dropping your comment..
Register A Free Domain:
- First go to site Freenom.com
- Then Enter your desire name in the box and click on Check Availability.
- Then click Get it now! on the domain you want to get and click on Checkout.
- Then in the next page at Period select 12 Months @ FREE
- Then in the next page Enter your mail address and click on Verify My Email Address.
- A verification like will be send to your mail address. Click on that link a new page will open.
- Now in this page Enter the required information and click on Complete Order button by checking the Terms and Condition box.
Setup Custom Free Domain in Blogger:
- Now Sign into your Blogger Account and go to Settings.
- Here in Publishing >> Blog Address click on Set up a third-party URL for your blog.
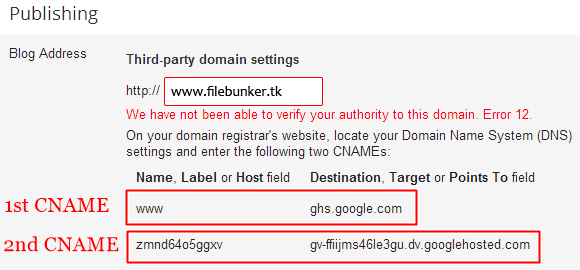
- Then enter your Registered domain with www - like www.filebunker.tk
- Now click on Save button, you will get an Error and you will get two CNAMEs as shown in the image below. Keep these two CNAMEs, these will be required to verify the authority of your register domain.
- Now click on this link FreeNom Client Area and Log in.
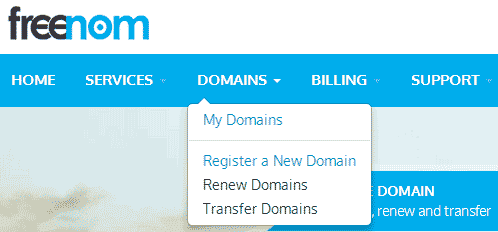
- Then from DOMAINS drop down click on My Domains.
- Now in this page click on Manage Domain button of the domain which you are going to add to your blog.
- Then in the next page click on Manage Freenom DNS and it will take you to the DNS MANAGEMENT page.
- Here in the DNS MANAGEMENT page you will get one Record box. But as you have two CNAMEs So, click on More Records button to another record box.
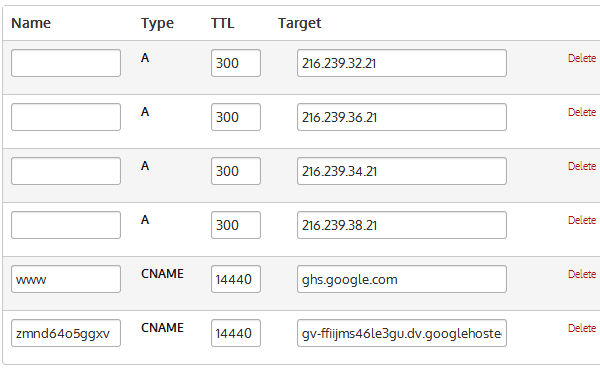
- Then Select CNAME in the both type, Then Enter both CNAME and Target Code you got on your Blog publishing section in the Name and Target box . Leave both TTL 14440. (Have a look at the image below , The codes shown in the below image will not work for you, because only your code will work for you)
- Now gain click on More Records to add Four (4) more Record box and This time these four records type will A and TTL will be 300. Now enter the following four IP address in the target box as it is shown in the image below.
- Then click on Save Changes button.
That's it the job is almost done. Now wait Wait around 5 to 10 minutes and then go to your Blogger Settings and try to save the domain as you have tried in the step above. This time the domain will be saved. Now view you blog and enjoy your Free Custom Domain.Name.
If this helped you while not sharing it with your friends out there!!!
Cheers!


Comments
Post a Comment
We love to hear from you!
Sign in to comment "anonymously" without entering verification text.